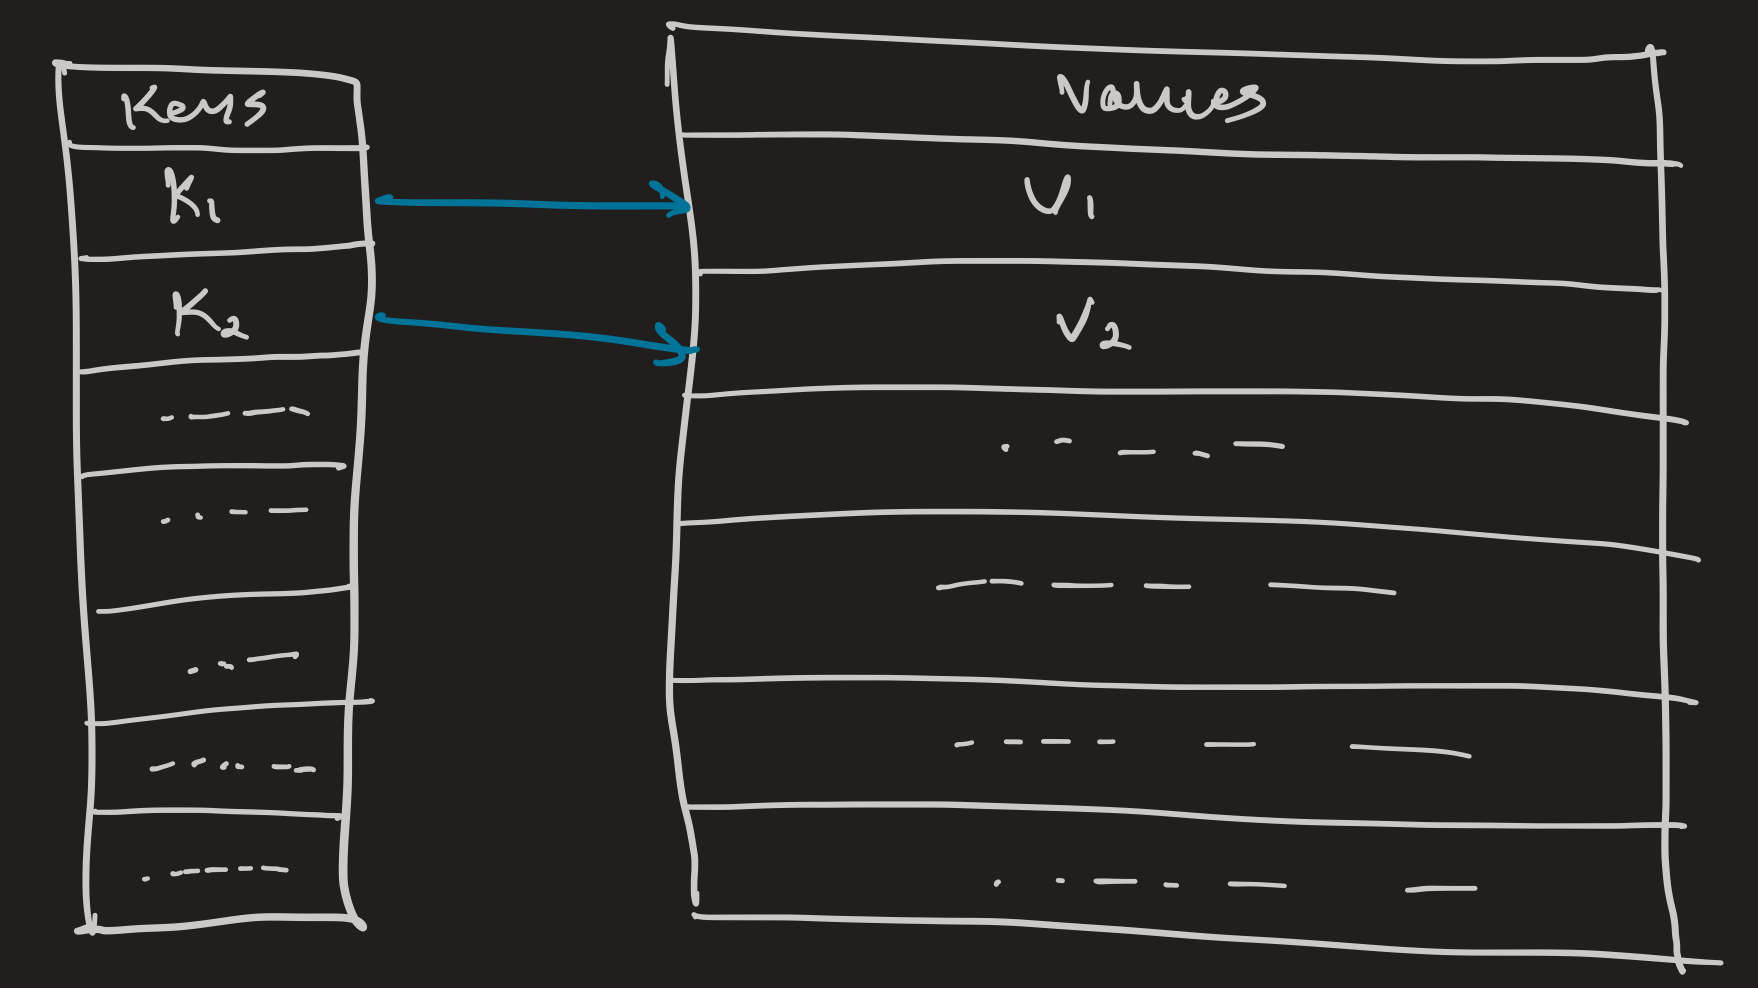
Building a Lightweight Key-Value Database in Go
This will be more of a high-level technical overview of key-value database design using notes from my research while working on Kagi, a on-disk key-value store.
At the bottom are some fantastic resources for better understanding B+Trees and Key-Value store design, definitely check those out.
Why build Kagi? #
About a year and a half ago, I decided to take Databases II. And as soon as the first assignment, a run-of-the-mill embedded SQL assignment, was released, I remember thinking “why can’t we just create a database instead”. So this past holiday, I thought I’d finally sit down and do just that.
Database design, and why a KV database? #
For this, ironically, I ended up pulling out my lecture notes from said Databases II class. Despite the dreadful assignments, this course did touch on some essential concepts of database design. Here is the bullet-point summary:
- Accessing the data (on-disk vs in-memory, ordered vs unordered, etc.)
- Executing queries (SQL compiler, query optimizer, etc.)
- Managing transactions (ACID, scheduling, batching, etc.)
- Maintaining the database (index updates, tombstone cleanup, etc.)
As you can already probably tell, databases can get pretty complicated.
Thankfully for a simple key-value database, we can focus on the first & the last parts to create a fully functional key-value store. And given my familiarity with B+Tree, it was an obvious choice for data access & organization to allow me to focus on the on-disk aspect. I would definitely
Representing a database connection #
To begin with, we create a struct that encompasses all the necessary attributes for a Kagi DB connection. First thing is the DB file itself. Second, we track the root node for our B+Tree. We also have a single mutex to make sure that changes to the DB file are synchronized. Lastly we have our loggers, one for general info, the other for fatal errors. With that we have this representation for a DB connection
type DB_CONNECTION struct {
	sync.Mutex
	file        *os.File
	filePath    string
	root        *Node
	count       uint32
	infoLogger  *log.Logger
	errorLogger *log.Logger
}
Hear me out, B+Tree … but on-disk.🤯 #
Since our B+Tree will be on disk, we have to deal with 2 integral changes to the traditional in-memory representation. The first is offsets instead of pointers, and the second is working with bytes instead of abstractions. Unix has a block size of 4096 bytes, as such we structure our B+Tree around that block size. To start off I settled on an Order=20 and a Degree=10 (Order is our upper limit for a Node’s bucket, and Degree is our lower limit) for the B+Tree. So this means we can fit a max of 19 key-value pairs in a 4KB node.
Here is an early sketch of a Node as I was considering what headers are necessary, and how many bytes each part required. All elements of the header use either uint16 (2 bytes) or uint32 (4 bytes) as there is no need for negatives for boolean flags or for counts.
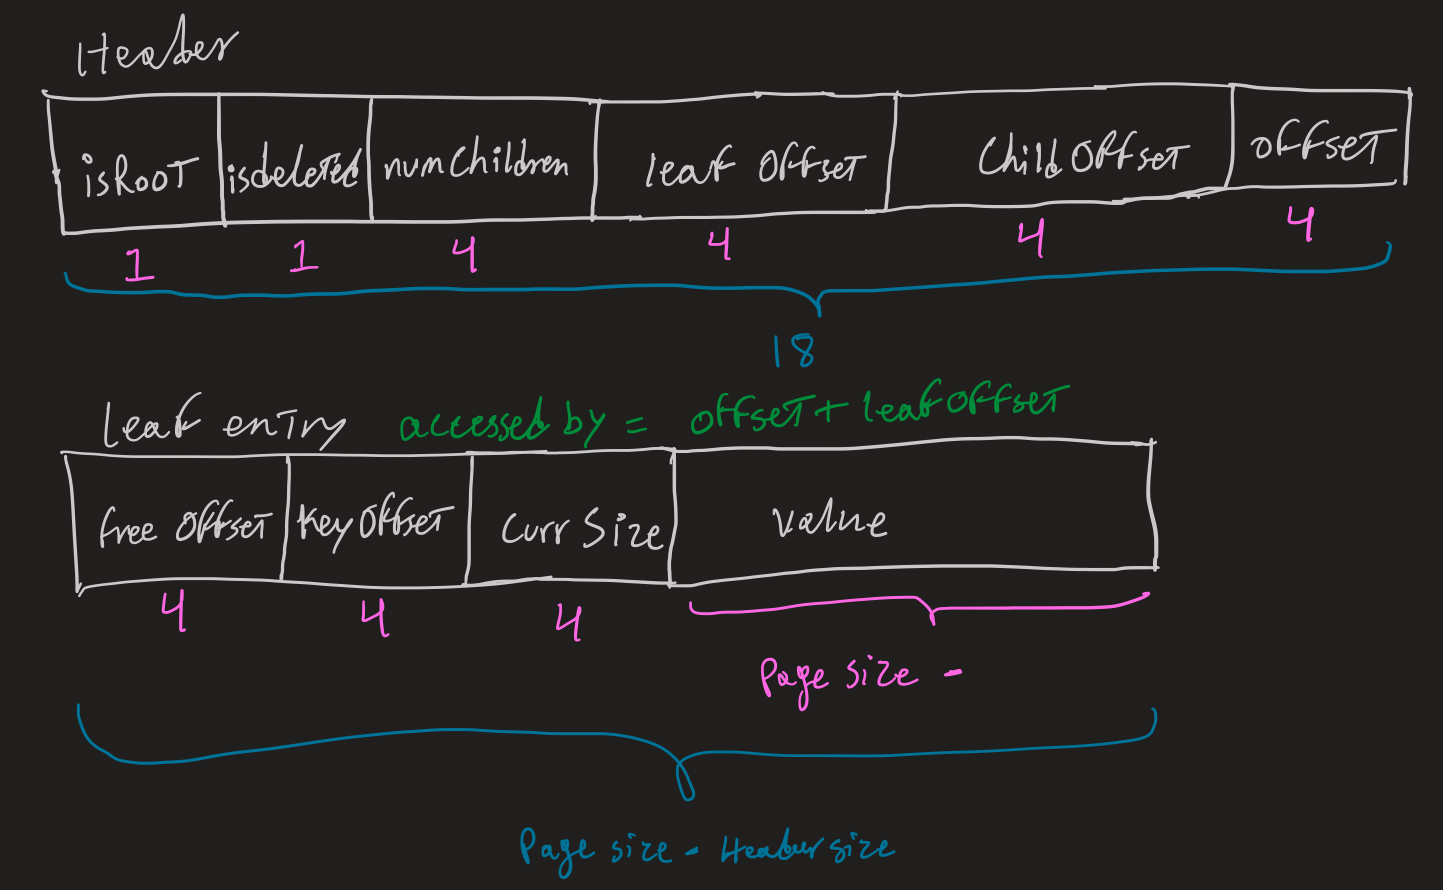
After deciding on the headers, I settled on about 192 bytes for the key-value pairs. Where keys ar 48 bytes and values are 144 bytes. With that here is the set of constraints utilized in Kagi to make sure we are maximizing what we can get out of the 4KB blocks.
const (
	Order        int32 = 20   // the upper limit for number of keys/values that node can hold
	Degree       int32 = 10   // the lower limit for number of keys/values that node must hold
	BlockSize    int32 = 4096 // max size of a node
	Int32Size    int32 = 4    // size of uint32 used for offsets in node
	Int16Size    int32 = 2    // size of uint16 used for flags and counts in nodes
	MaxKeySize   int32 = 48
	MaxValueSize int32 = 144
)
Constructing our node #
With our byte constraints set, we can setup our Node structure. One of the more confusing aspects of this project was in fact managing all the offsets necessary. In the end, it took some trial & error to figure out which offsets were necessary, and which were just waste of space.
As in all B+Trees, we will have two types of nodes:
- Branching Node: holds a bucket of keys to direct us in the tree
- Leaf Node: holds a bucket of key-value pairs
Both type of nodes have the same headers, but different buckets. These headers are used to tell us about the state (leaf count, deleted marker, etc.). If a node ever has child offsets then we know that we it is a branching node, otherwise it’s a leaf node.
type Node struct {
	//----Header----
	// Flags
	isRoot    uint16
	isDeleted uint16

	// Counts
	dbCount   uint32
	numKeys   uint16
	numLeaves uint16

	// Offsets
	offset       uint32
	parentOffset uint32
	childOffsets []uint32
	// -------------

	// branching node
	keys [][]byte

	// leaf nodes
	leaves []*Leaf
}

type Leaf struct {
	// data
	key   []byte
	value []byte
}
But first, some tests #
With the Node struct done, we can start on B+Tree operations. But first, tests. Below is a simple test for setting/getting 100 key-value pairs. The test generates random values to use for key & value, each 5 bytes.
func TestSet100Keys(t *testing.T) {
	db := Open(testClearOptions)
	rand.Seed(time.Now().UnixNano())
	seq := randSeq(1000)

	for i := 0; i < 1000; i += 10 {
		k := seq[i : i+5]
		v := seq[i+5 : i+10]

		err := db.Set(k, v)
		db.logError(err)
	}
	db.Close()
}

func TestGet100Keys(t *testing.T) {
    ...
	// Same as test for Set
    ...

	for i := 0; i < 1000; i += 10 {
		k := seq[i : i+5]
		v := seq[i+5 : i+10]

		found, err2 := db.Get(k)
		if found != v {
			t.Error(err2)
			t.Errorf(`test %d, actual: "%s", expected: "%s"`, i/10, found, v)
		}
	}
	db.Close()
}
Now, thanks to TDD, we work on flipping those failing tests upside down.
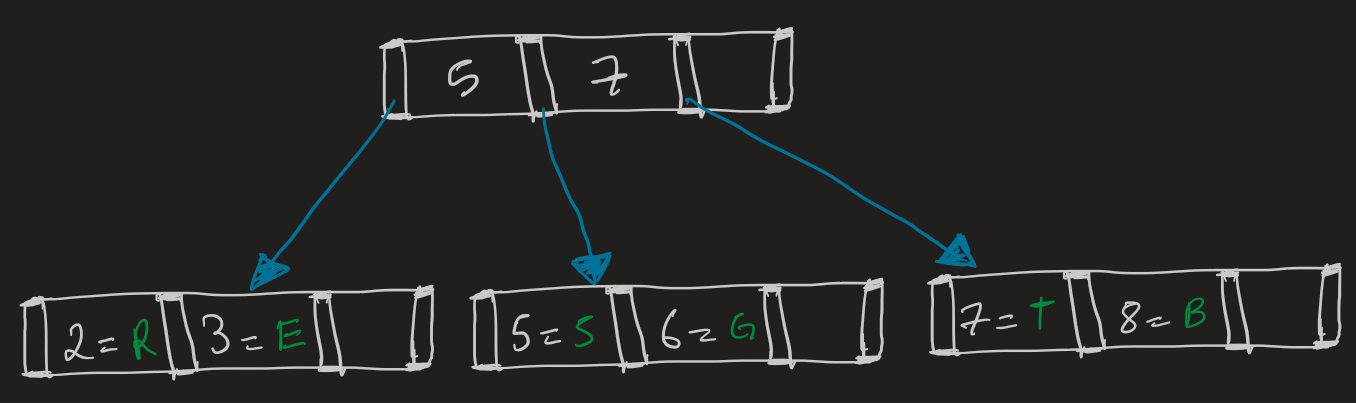
Traversing the on-disk tree #
First operation up is tree traversal. Traversing the on-disk B+tree is pretty similar to in-memory, with a slight twist, offsets. You start at the root node (which the DB always knows), then recursively traverse using child offsets - instead of pointers - with keys as direction markers. Below is a representation of our B+Tree.
Updating the on-disk tree #
Now that we can freely traverse our tree, we move onto updating it. For adding a new key-value pair, we first find which node it fits into by traversing the tree. Once we insert the new data in the node’s bucket, there are 2 scenarios:
- If it’s not full, then we are done.
- If it’s full, then we have to split the node up.
Splitting a node up #
If we ever fill up a node (number of keys equal Order), we split up the node into 3 nodes. In summary follow this basic algorithm:
- Splits leaves into 3 parts.
- Middle becomes a branching node.
- Left & Right become child nodes of the Middle.
- Add middle node as child to parent.
- If parent is now full, split parent node as well.
Run it back ✔️ #
With the traversal & updates for our B+Tree implemented - code too long to showcase here - we can now run our tests (added a test to make sure everything was saved on exit) to get those sweet, sweet passes.

On next episode #
We got just two things left, and we got a fully functional key-value database, deletion & index maintenance. I plan to wrap up this features soon, and perhaps add a “Space” functionality to group a set of keys together. But this we’ll have to do for now.
If you’ve read this far, first of all thank you. Second, if you have any feedback please do feel free to hit me up about it, I’d really appreciate it.
Resources: #
- A fantastic B+Tree visualizer: https://www.cs.usfca.edu/~galles/visualization/BPlusTree.html
- Chapter from “Database Internals” by Alex Petrov on implementing on-disk B+Tree: https://www.oreilly.com/library/view/database-internals/9781492040330/ch04.html
- Look into B+Tree indexing in Oracle: http://web.archive.org/web/20161221112438/http://www.toadworld.com/platforms/oracle/w/wiki/11001.oracle-b-tree-index-from-the-concept-to-internals